Headquarters
Vantage6 HQ is the central point of the vantage6 platform. It is responsible for managing the organizations, nodes, collaborations, etc., and managing the communication of task requests and results between the nodes and the users.
Communication with the vantage6 server is managed through a RESTful API and socketIO server.
Configure
Vantage6 HQ requires a configuration file to run. This is a yaml file with a
specific format, designed to be used with the vantage6 HQ Helm chart.
This section will help you to create a basic configuration file, but
will not cover all possible configuration options, as that would make a basic setup too
complex.
Below, we list all possible configuration options. You can download this file here:
hq_config.yaml
# Override the kubernetes chart name
nameOverride: vantage6-hq

# Specify the kubernetes namespace in which the server will be deployed. Optional,
# by default the Release.Namespace is used
namespace: vantage6-hq

server:

  # Whether the HQ is deployed standalone or as part of a vantage6 hub.
  standalone: false

  # The description of the server
  description: Vantage6 server version 5

  # Let the server know where it is hosted. This is used for communication with other
  # vantage6 components. E.g. for the community server:
  baseUrl: https://uluru.vantage6.ai
  # For a localhost server with default settings:
  # baseUrl: http://localhost:7601

  # API path prefix. Server may be reached at https://my_server.org/<apiPath>/<resource>.
  apiPath: /hq

  # The image used to start HQ
  image: ghcr.io/vantage6/infrastructure/hq:latest
  # Node image pull policy. Possible values are: Always (default), IfNotPresent, Never
  imagePullPolicy: Always

  # The number of replicas of the server
  replications: 1

  # Port that the server exposes on the internal network from the containers
  internal:
    port: 7601

  # Port that the server exposes on the kubernetes service to the outside world
  port: 7601

  # If you want to couple algorithm stores to the server on startup, you can add them
  # here. The name is used to identify the algorithm store in the server's database.
  # The url is the URL of the algorithm store's API.
  algorithm_stores:
    - name: Local store
      url: http://localhost:7602/api
      api_path: /api

  # Keycloak configuration. Values here override the global Keycloak settings
  # in the hub configuration (`global.keycloak`) for HQ.
  keycloak:
    url: https://auth.vantage6.ai
    realm: vantage6
    adminUsername: admin
    adminPassword: admin
    adminClient: backend-admin-client
    adminClientSecret: myadminclientsecret

  # The secret key used to generate JWT authorization tokens. This should
  # be kept secret as others are able to generate access tokens if they
  # know this secret. This parameter is optional. In case it is not
  # provided in the configuration it is generated each time the server
  # starts, thereby invalidating all previous distributed keys.
  # Recommended for development, but DO NOT use in production!
  jwt:
    secret: "super-secret-key-that-you-shouldnt-use-in-production"

  # Cleanup settings: This is used to cleanup the database from old results.
  # Every hour, results older than the threshold for completed runs are deleted.
  # Disabled by default.
  # Careful! Make sure you have regular backups of your database before enabling this
  # feature, as a wrong configuration could lead to data loss.
  runs_data_cleanup_days: 30
  # Whether to also delete the algorithm arguments of the runs. False by default.
  runs_data_cleanup_include_args: false

  # Set up with which origins the server should allow CORS requests. The default
  # is to allow all origins. If you want to restrict this, you can specify a list
  # of origins here. Below are examples to allow requests from the Uluru UI, and
  # port 7600 on localhost. Usually, only the UI needs to access the server.
  cors_allowed_origins:
    - https://portal.uluru.vantage6.ai
    - http://localhost:7600

  # Settings for the large result store. By default, the server uses a database to store all arguments and results.
  # Adding this will set Vantage6 to use blob storage rather than the database for both argumentsand results.
  large_result_store:
    # Type of the large result store. Currently, only "azure" is supported.
    type: "azure"
    # The name of the Blob Storage container to use for storing large results.
    container_name: test-container

    # Use this block for connection string authentication:
    # -------------------------------------------------------
    # Connection string to the Storage account. Useful for testing purposes, such as connecting to Azurite.
    # The example connection string uses the default account name and key for Azurite.
    connection_string: "DefaultEndpointsProtocol=http;AccountName=devstoreaccount1;AccountKey=Eby8vdM02xNOcqFlqUwJPLlmEtlCDXJ1OUzFT50uSRZ6IFsuFq2UVErCz4I6tq/K1SZFPTOtr/KBHBeksoGMGw==;BlobEndpoint=http://172.17.0.1:10000/devstoreaccount1;QueueEndpoint=http://172.17.0.1:10001/devstoreaccount1;"
    # -------------------------------------------------------

    # Or use this block for service principal authentication:
    # -------------------------------------------------------
    # Credentials for accessing the Blob Storage. If provided, these will be used instead of the connection string.
    # tenant_id, client_id, and client_secret are required for authentication.
    tenant_id: "your-tenant-id"
    client_id: "your-client-id"
    client_secret: "your-client-secret"
    # Name of the storage account.
    storage_account_name: "your-storage-account-name"
    # -------------------------------------------------------

  logging:
    # Controls the logging output level. Could be one of the following
    # levels: CRITICAL, ERROR, WARNING, INFO, DEBUG, NOTSET
    level: DEBUG

    # Location to the log file
    file: hq.log

    # Size in kb of a single log file
    max_size: 1024
    use_console: true

    # Date format for the log file
    datefmt: "%Y-%m-%d %H:%M:%S"

    # Format for the log file
    format: "%(asctime)s - %(name)-14s - %(levelname)-8s - %(message)s"

    # Storage configuration for logs. Storage size is set to 128M by default,
    # and storage class is k8s storage class that is used.
    storageSize: "128M"
    storageClass: "local-storage"

    # Host path for storing the logs (required for local-storage PV)
    volumeHostPath: "/var/log/vantage6-hq"

    # Maximum number of log files to keep. Log files are rotated when the size of the
    # current log file exceeds `max_size`.
    backup_count: 5

    # Loggers to include in the log file
    loggers:
    - level: warning
      name: urllib3
    - level: warning
      name: socketIO-client
    - level: warning
      name: socketio.server
    - level: warning
      name: engineio.server
    - level: warning
      name: sqlalchemy.engine

  # Development mode settings. Only use when running a vantage6 infrastructure locally.
  # Commands such as `v6 sandbox` and `v6 dev` will use these settings automatically.
  dev:
    # Specify the URI to the host from within a server container. When using
    # Docker Desktop, you can use the special hostname `host.docker.internal` to refer
    #to the host machine. On Linux, you should normally use http://172.17.0.1.
    host_uri: host.docker.internal

    # Address of the algorithm store. This can be provided to the server for
    # a custom address of the local algorithm store within the k8s cluster.
    store_address: http://vantage6-store-store.service.default.svc.cluster.local

    # Whether to forward ports to host locally using kubernetes or not, using the
    # NodePort feature of kubernetes. If set to false, the ports will
    # not be forwarded. In production, this should be false and you are responsible
    # for forwarding the ports with your own ingress, gateway or load balancer.
    # In `v6 dev`, this is also set to false as ports are forwarded by devspace.
    forward_ports: true
    # If forward_ports is true, this is the port that will be exposed on the host.
    local_hub_port_to_expose: 30761
    # And these ports will be exposed for the UI and prometheus (if enabled).
    local_ui_port_to_expose: 30760
    local_prometheus_port_to_expose: 30763

  # Additional debug flags
  debug:
    # Set to `true` to enable debug mode for the socketio server
    socketio: false

    # Set to `true` to enable debug mode in the Flask app
    flask: false

ui:

  # The image used to start the UI
  image: ghcr.io/vantage6/infrastructure/ui:latest
  # Node image pull policy. Possible values are: Always (default), IfNotPresent, Never
  imagePullPolicy: Always
  # Service port for the UI
  port: 7600
  # keycloak settings
  keycloak:
    realm: vantage6
    client: public_client
    publicUrl: http://localhost:7680

  # Allowed algorithm stores for Bearer token inclusion (comma-separated URLs)
  # Use "*" to allow all stores (less secure) or specify specific URLs, e.g.
  # allowedAlgorithmStores: "http://localhost:7602 https://store.uluru.vantage6.ai".
  # If you don't want to run tasks via the UI, you can also set this to an empty string
  # for the strictest CSP policy.
  allowedAlgorithmStores: "*"
  # Community algorithm store URL.
  communityStoreUrl: https://store.uluru.vantage6.ai
  # Community algorithm store API path
  communityStoreApiPath: /api

rabbitmq:
  # The image of the RabbitMQ server
  image:
    repository: rabbitmq
    tag: 3-management

  # The username of the RabbitMQ server
  username: rabbitmquser

  # The password of the RabbitMQ server
  password: rabbitmquserpassword

  # The vhost of the RabbitMQ server
  vhost: /vantage6

database:

  # whether or not to use an external database
  external: false

  # The URI of the external database. Only used if `external` is set to true.
  uri: postgresql://vantage6:vantage6@localhost:5432/vantage6

  # The image of the database
  image:
    repository: postgres
    tag: 13

  # The username of the database
  username: vantage6

  # The password of the database
  password: vantage6

  # The name of the database
  name: vantage6

  # Path on the host machine where the database is stored
  volumePath: /mnt/data_server

  # The name of the k8s node where the server is running
  k8sNodeName: docker-desktop

# Settings for enabling monitoring of vantage6 nodes resource usage (e.g. CPU, memory).
# This is done using Prometheus. There are two components to this:
# 1. The Prometheus exporter (running as part of vantage6 HQ), which collects
#    the metrics from the nodes.
# 2. The Prometheus server (running as a separate service), which scrapes the
#     metrics exposed by the Prometheus exporter and stores them.
prometheus:
  # Set to true to enable Prometheus reporting. Default is false. Note that nodes need
  # to be configured to report metrics to the server to be useful.
  enabled: false

  # **The settings below are only used if enabled is true**
  # The port on which the Prometheus exporter will be available.
  exporter_port: 7603
  # image to use for the Prometheus server.
  image: prom/prometheus:latest
  # The size of the storage for the Prometheus server.
  storageSize: 2Gi
  # The kubernetes storage class to use for the Prometheus server.
  storageClass: local-storage
  # The host path for storing the Prometheus server data.
  volumeHostPath: /var/lib/prometheus
Where is my configuration file?
To see where your configuration file is located, you can use the following command
v6 hq files
Warning
This command will only work for if HQ has been deployed using the v6 commands.
The directory where to store the configuration file depends on your
operating system (OS). It is possible to store the configuration file at
system or at user level. At the user level, configuration files are only
available for your user. By default, HQ configuration files are stored at
system level - except if you have created a sandbox environment using the
v6 sandbox commands.
The default directories per OS are as follows:
OS |
System |
User |
|---|---|---|
Windows |
|
|
MacOS |
|
|
Linux |
|
|
Warning
The command v6 hq looks in certain directories by default. It is
possible to use any directory and specify the location with the --config
flag. However, note that using a different directory requires you to specify
the --config flag every time!
Similarly, you can put your HQ configuration file in the user folder
by using the --user flag. Note that in that case, you have to specify
the --user flag for all v6 hq commands.
Permission management
Almost everything in vantage6 HQ is under role-based access control: not everyone is allowed to access everything.
There are three types of entities that can attempt to use vantage6 HQ: users, nodes and algorithm containers. Not every resource is available to all three entities. For example, only users can create new users or organizations, and only nodes are allowed to update the results of a task (the algorithm itself cannot do this as it exits when it finishes, and users are not allowed to meddle with results).
The fact that users are allowed to create new organizations, does not mean that all users are allowed to do so. There are permission rules that determine what every user is allowed to do. These rules are assigned to a user by another user. A user that creates a new user is never allowed to give the new user more permissions than they have themselves.
Nodes and algorithm containers all have the same permissions, but for specific situations there are specific checks. For instance, nodes are only allowed to update their own results, and not those of other nodes.
The following rules are defined:
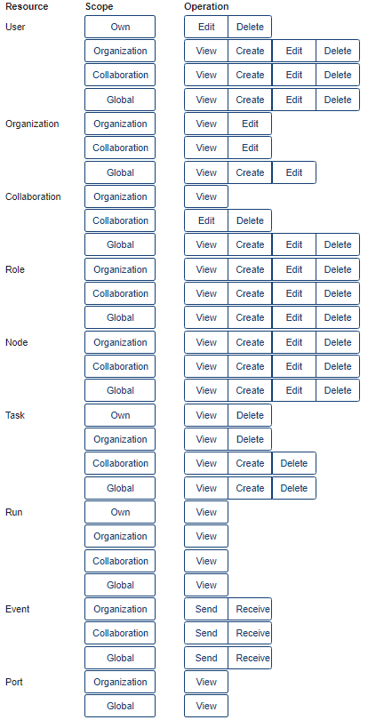
Fig. 3.1 The rules that are available per resource, scope, and operation. For example, the first rule with resource ‘User’, scope ‘Own’ and operation ‘View’ will allow a user to view their own user details. Note that this figure may become outdated - however, the principles remain the same.
The rules have an operation, a scope, and a resource that they work on. For instance, a rule with operation ‘View’, scope ‘Organization’ and resource ‘Task’, will allow a user to view all tasks of their own organization.
There are six operations (view, edit, create, delete, send and receive). The first four correspond to GET, PATCH, CREATE and DELETE requests, respectively. The last two allow users to send and receive data via socket events. For example, sending events would allow them to kill tasks that are running on a node.
The scopes are:
Global: all resources of all organizations
Organization: resources of the user’s own organization
Collaboration: resources of all organizations that the user’s organization is in a collaboration with
Own: these are specific to the user endpoint. Permits a user to see/edit their own user, but not others within the organization.
A user may be assigned anywhere between zero and all of the rules.
Note
When you create a new hub, the first time it is started, a new user ‘admin’ is created that has all permissions. This user should be used to create the first users and organizations.
To make it easier to assign permissions to users, there are roles. A role is simply a set of rules. When a user is assigned a role, they are assigned all the rules that are part of that role.
The permission structure of vantage6 allows for a lot of flexibility. However, especially for beginning users, it can be a bit daunting to set up all the permissions. Therefore, there are some default roles that can be used to quickly set up a hub. These roles are, in descending order of permissions:
Root: all permissions
Collaboration Admin: can do almost everything for all organizations in collaborations that they are a member of, e.g. create new users but not delete the entire collaboration
Organization Admin: can manage users, roles, and nodes in their own organization, and view organization resources
Researcher: can view the organization’s resources and create tasks
Viewer: can only view the organization’s resources
We do recommend that you review the permissions of these roles before using them in your own project.